Path: Right click on the scheduler icon  from the main menu, click Providers
Before your office can schedule appointments for patients, you must first set up your provider information including days/hours that the provider will be working.

DATE RANGE BUTTON
This is a completed list of providers that you will see when you have finished.

Starting at the top of the screen, the scheduler can either be set up for room or provider. We suggest that you always set it up for your providers. You can use the columns section of the appointment scheduler to set up rooms or slots. At the top of the screen put in the doctors first and last name, the way that you want the doctor to appear on the scheduler gets entered under the provider column. Enter their work phone number. You would only check the inactive box when you need to inactivate a provider that is no longer working in your clinic.
Under the starting date, you would want to put the date that you intend to start using the scheduler – often the same day as you enter this screen. For the ending date, we suggest that you put a date far off in the future. You do not want to change your schedule every week. When you have finished entering information, click the Save  button.
At the top, Input the provider this calendar will be linked to, and the rest of the information will automatically be filled in. If the person this calendar is for is not a Staff Doctor, simply fill in their information in the First Name, Last Name, Provider, and Work Phone.
When creating a new provider, it is best to only add one date range, and to put it to a date sometime reasonably far out in the future. In this example, the calendar will end in 2012.
To input a date range, click New, select a starting date, an ending date, and choose save.
To edit a date range, select it from the table on the right, and modify the ending date, then choose save.
To delete a date range, select it from the table on the right, and choose delete.
The first button on the bottom of the screen allows you to set a date range after you have input providers information at the top.
DAYS
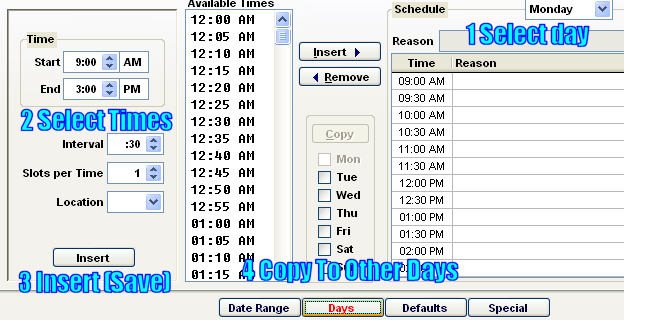
Take note of the numbered fields (in blue) as this is the order in which you will add your specific practice / provider hours.
The DAYS page will always default to Monday.
#1 Select the schedule day using the drop down arrow.
#2 Input the Start time, then the End time. INTERVAL – Choose how many minutes will be the interval between appointment times. It is recommended that you leave SLOTS PER TIME at a default of 1.
#3 Click the INSERT button at the bottom to create the days schedule.
#4 If any other days share the same operational hours as the selected day, check them off in the boxes and select "Copy" to copy this same schedule to those days. To add or delete an individual timeslot, select it from the list on the left or the schedule on the right and choose to insert the time, or remove the time.
REPEAT THIS PROCESS FOR THE REMAINDER OF DAYS
DEFAULTS
The Defaults button controls certain default settings for this provider, and is where the user can setup multiple rooms (columns).

Various warnings + Alerts to error-proof the appointment entry can be set-up:
Place a check mark in the box of any feature you would like to enable on your Scheduler
Maximum number of columns:
Raise this value to create new rooms (columns), the maximum number allowed is 7. If there is a warning about exceeding scheduler defaults it is because the CONFIGURATION is set to a number LOWER than what you have indicated on columns counter. (See: Configuring the Appointment Calendar.)
Click on the Assign Column button to name the columns. By default column "1" will be named Room 1, and so on. Common themes are to change them to room names (x-ray, exam, etc) or doctor names.
When you click the assign columns button a box will pop out that shows your rooms / columns. If you have not yet done this, the list will be empty.
To begin adding Names for the rooms/columns, click the NEW icon .